Recent Articles
- Couvillon or The Burgoo of the Bayou
- Saving Time With An Instant Pot
- Easy Things To Pressure Can
- Food Names Used Wrong
- Makin' Ice (Countertop Ice Machine)
- Contesting Colcannon
- Let Us Not Forget Funger
- And Then There Is Haggis
- Eat The Weeds
- There's Never a Recipe for Burgoo
- Myths About Sugar, And Why It Is NOT Bad For You
- Why I Will Never Buy an Excalibur Dehydrator
- The Backlash of a Low Salt Diet
- Its So Healthy But I Just Don't Like It!
- ENOUGH With the Cauliflower Already!
- Medicinal Herb and Supplement List
- Black Forest Loin Ham (Dry Cured)
- Glutamate Isn't Evil, Here's Why
- Wheat Berries Fast and Tasty
- Don't Bother Buying a Waterbath Canner
- I Do NOT Need an All American Canner
- Reducing Liquid Loss in Canning
- Canning Hash
- Guide to Buying a Grain Mill
- Salt Curing Meats
- Differences Between a Freeze Dryer and a Dehydrator
- Canning Tamales - Yeah!
- Using a Pressure Canner as a Steam Canner
- Apple Scrap Uses
- What Do I Do With Oranges and Peels
- EASY Rabbit Jerky
- Abandoning the WAPF Ship
- More Than Cranberry
- Differences Between Lamb and Mutton
- Sweet Potato Myths
- Medicinal Clay
- Rancid Olive Oil
- Where is Weston A. Price's Traditional Fermented Cod Liver Oil?
- Paleo Diet's Flawed Premise
- About Sifting Flour
Real Food Heritage
-
Wisdom from Food Heritage
-
Chemicals In Our Food
-
Domestic Meats
-
Wild Meats
-
Dairy
-
Fruits
-
Vegetables
-
Eggs
-
Grains
-
Nuts and Legumes
-
Mushrooms
-
Wild Foraged Foods
-
Grow Your Own
-
Pickling and Curing
-
Supplements
-
General Health
-
Moods and Behaviors
-
Food Myths
-
Earning from Real Food
-
Heritage Preserving
-
Seasonal Eating
-
Politics of Food
-
Healthy Oils
-
Healthy Proteins
-
Healthy Carbohydrates
-
Real Food Recipes


Click to Download Your Free Heritage Pickling and Culturing e-Book Now!
Instant Download, NO Registration Required!
Real Food Recipes
A collection of recipes both ancient and contemporary, to help incorporate real and whole foods into a modern life.
Incredible Tuna Salad
Ok, we all know if you add celery, that is Restaurant Tuna Salad... But beyond that, Tuna is just great. Sandwiches, on Crackers, or on Lettuce, we love it.
But wait!
It gives me diarrhea. Like BAD... And a bellyache.
What now? I really do love tuna, and my body just NEEDS fish regularly.
The key is PICKLES.
Put in relish. Sweet, or Dill, or even Bread and Butter or Pickled Yellow Peppers or Pickled Salsa. Tastes even better, and NO BELLYACHE! Seriously, no bellyache, and no diarrhea.
Using Albacore also helps. It is quite a bit more digestible than Chunk Light.
We can also add some other wonderful things.
- Mustard - Mustard is great with tuna, and it may be enough for some people to stop the bellyache, but not for everyone. Goes great with Sweet Relish or Bread and Butter Pickles. Too sour with Dill though, unless you want to add a little sugar to it.
- Celery - We add chopped celery, and the leaves.
- Onion - Sauteed or Raw, either one. Dried onion works too, and even onion powder. If onions give you indigestion, try just a little onion powder for a whiff of flavor.
- Diced Tomatoes - Yummy! Mix them in and they won't make the tuna squish out of the bread when you bite.
- Capers - A family member says these are really good in tuna, they are just pickled peppercorns, after all.
And on top...
- Durkee Onions - Need I say more?
- Potato Chips - BBQ are best. REALLY! You won't believe it until you try it (great on a Tuna Casserole too).
- Fritos - The all purpose salty chip.
For years I could not eat tuna, and then I started putting relish in, and it just solved the problem. So amazing.
Scrumptious Maple Oatmeal Pancakes
Fell into these pancakes, and have not yet got over them. I've always been a French Toast sort of girl, pancakes weren't my thing. But these... I CRAVE these.
You can add some nuts or cranberries if you like, but they are so good just plain with butter. I love them with apple butter on them also (good homemade stuff, NOT that yucky over spiced stuff some people call apple butter).
Maple Oatmeal Pancakes
- 2 cups flour
- 2 pkts instant Maple Oatmeal (we like Great Value best - you know, the stuff that really ISN'T instant that we hate for making oatmeal?)
- 1 tsp baking powder
- 1/8 tsp salt
- 1/3 cup oil
- 2 eggs
- 3/4 to 1 cup milk, depending on how thin you want it
Mix it all up.
Fry on a hot griddle IN BUTTER until set in the middle.
Serve hot, with syrup, butter, jam, or apple butter.
Now... You can make these with a pancake mix also, just add the two packets of oatmeal to the mix. They'll be sweeter, and you may have to add a little more milk to thin them down a bit more. But it works.
Scratch Soup Without A Recipe
Anyone can make soup. And it can be magical. Something out of Tales of Despereaux (the original BOOK, not the movie travesty).
Soup is food you can make when your cupboards are getting a bit bare, if you know the rules for various types of meat and ingredients. You can generally make an excellent soup, even with limited ingredients, and it does not have to become Burgoo.
Our family served soup often when we had dinner guests. Oh, we don't mean dinner PARTY guests, nothing like that. We never HAD that kind of guests! I mean the neighbor kid who is there at dinner time, the missionaries who dropped by and needed fed, or friends who were invited, family staying with us, and other day to day dinner guests. We always knew we could throw together a tasty and filling meal when we served home made soup.
Our children learned to cook soup early on, and I taught them that certain things made the soup great.
A large bowl of dense and tasty soup, with a loaf of fresh bread, store bought dinner rolls, or refrigerator biscuits hot from the oven, makes a satisfying meal, and nobody ever complains.
Be careful not to use too much hot pepper or garlic. This is now a common mistake, and you may be able to eat your own soup, but your guests may not be able to finish their bowl, and that is a real shame. It is never good to send your guests home hungry.
There are ingredients that make soup taste good. And combinations that make it taste great. I'll try to explain a few.
- Mir Poi - Celery, Carrots, and Onions. A good base for the vegetables in most soups, and a lot of casseroles, and even some kinds of haggis! Use a lot of onion if you want a nice savory flavor. Don't forget to use the Onion Tops, and the Celery Leaves. They are great additions to soup.
- Butter - Any soup tastes better with butter. A lot of butter. Adding fat makes it more satisfying, and helps fill out the flavors.
- Salt - Salt it until it tastes oh so good. If you cook it some more, test for salt again at the end, because cooking causes ingredients to absorb more salt, leaving the broth a little weak. DO NOT USE SALT SUBSTITUTE. Not only is it BAD for you (Salt is GOOD For you - the human body REQUIRES quite a lot of salt, and your TONGUE knows how much you need - if it TASTES GREAT, you have the right amount), but Salt Substitutes TASTE BAD, giving a harsh over salted flavor that kills your enjoyment of the food. Your body cannot USE Salt Substitute for metabolic processes like it does genuine salt, and the Substitute does NOT flush out easily, it does some damage before it can be cleared out. Real Salt. Real Good. Real Good For You.
- Broth - It helps boost the flavor. But water will do if that is what you have. We often substitute Boulion or Soup Base for Broth, and this is ok, as long as you do not get too much. This is one way to deepen the flavors, especially with Pork. Ramen seasoning packets also work.
- Meat - Chop it fine or grind it and crumble it fine if you need a little to go a long way. Otherwise, 1/2" or larger pieces satisfy better.
- Meat Fat - Bacon fat is the most versatile. But I've reserved Lamb Fat, Beef Fat, and Pork Fat, even Chicken Fat (harder to do) for use in soups and biscuits. A combo of Bacon Fat and Butter is unbeatable in most soups. I NEVER drain the fat off cooked meats when making a soup or casserole, the fat just gets mixed right in for extra flavor and nutrition. Don't be silly, dear, of course it is not unhealthy! Brain cells and other nerve cells REQUIRE animal fats to repair or grow. This is why these fats taste so good! Because our bodies LIKE them, they know JUST how to use them!
- Okra - That love it or hate it vegetable that is responsible for the distinctive flavor of Minestrone, and Gumbo. We ALWAYS want it in certain soups, and NEVER want it in anything else.
- Other Vegetables - Peas, Green Beans, Corn, Cabbage, Spinach, Parsnips, Squash, Turnips if you must, and other vegetables help to round out flavors in one direction or another. Use Pod Peas, and Baby Corn for Oriental style soup.
- Tomatoes - Adds a depth and tang to soups with deeper flavors. Sometimes other fruits are added in the place of tomatoes, such as pineapple, apple, orange, or lime (a squirt of lime in anything Mexican really kicks the flavor).
- Beans - A wide variety of beans can be added to soups, to broaden the flavors and round out the nutritional density. Beans are easiest to digest when cooked until very tender, and when stewed with tomato or other acidic foods, and meat also helps us digest and metabolize bean aminos.
- Barley - Takes about an hour to cook, but can help expand a soup nicely.
- Wheat Berries - Takes about 2 hours to cook, and can help increase nutrition. Use 1-2 tablespoons for a 2-3 qt pot, a little goes a long way. I put whole wheat into a crock pot, with 1 cup of wheat berries per 4 cups of water, and let it cook overnight. I let it cool in the morning, and then drain it and bag it in Zip bags, about 1/2 cup per bag. It not only works well for soups, but is a nice addition to fried rice, oatmeal or cream of wheat.
- Noodles - We love them. Don't use those big chewy things, keep them thin enough to be enjoyable. All sorts are used in soups. Bean thread noodles take your dish right into Asian, with a flavor that won't interfere with delicate and savory soups.
- Rice - White or brown goes into many kinds of soups.
- Potatoes - A soup standby. We love them.
- Seasoning Salt - We like Redmond Real Salt Seasoning Salt. But use what makes it taste good. If you don't have Seasoning Salt, then some Poultry Seasoning, a dust of Garlic Powder, Pepper, Paprika, and a light dust of MSG, and then some salt, will add a lovely sparkle to the flavor of almost any soup.
- Garlic - Easy to get carried away. Just sprinkle in a little granulated or powdered garlic and let it brighten the broth without dominating.
- Cayenne or Black Pepper - Add a little zing or heat, but don't overdo. We want to TASTE the magnificence, not just blast our tongues with heat.
- Soy Sauce - Can be added to increase a beefy flavor, but don't add too much! I personally feel that the quality of the Soy Sauce makes all the difference. Kikoman tastes beefy, and salty. Some others just taste kinda weird. It can be added to other meats, and often is with Oriental style dishes. If you use Soy Sauce, you need to REDUCE the amount of Salt that you put in.
- MSG - WHAAAT? How could we? Actually, GOOD MSG is GREAT! It is the savory thing that makes Celery and Beet Tops taste good. It is good with meats, many vegetables, and some sauces. In a soup, a tiny bit makes the soup go from acceptable to delectible. I use Accent, and it is generally very good MSG. I am rabidly allergic to BAD MSG, but I really crave GOOD MSG. You just lightly dust it on, you use FAR less than you do with salt, and it is better to use too little than too much - it tastes very strongly salty if you get too much. Glutamate in healthy forms is the MOST COMMON nutritional source of neurotransmitters, and converts in one step to any other neurotransmitter, and in two steps to any other inhibitory neurotransmitter. You just can't OD on the healthy forms, they just convert to whatever else it is you need instead.
- McCormick Umami, or other Mushroom Based Seasonings - McCormick's Umami Seasoning adds a deep and somewhat dark depth to foods. For Soup, it works well with Beef, and LIGHTLY with Pork. You don't measure it in, you just dust the top of the soup with it, and stir it in. Too much is NOT good! It will go strong and you won't feel like finishing the dish. But for Beef Soups, it adds that deep and mysterious complexity to the broth that makes it taste like you did something magical. You'll still need MSG if you like a real savory flavor, but this rounds out the salts and broadens the flavor profile.
- Onion Soup Mix - When you need something to deepen the flavor for Beef or Pork or Lamb or Pigeon or Duck, Onion Soup Mix powder is great to toss in. We do still add more onion. Be careful not to get too much, and get a brand that does NOT have salt substitute. Put this in BEFORE you add salt. Otherwise you may oversalt the dish.
That said, there are keys to many soup types, and specific ingredients that make the soup THAT GOOD when you put them in.
Beef - It is the tomato. Beef soup will always taste better if you add some tomato sauce, diced tomato, crushed tomato, etc. Ketchup WON'T do the job, you just won't like it.
Chicken - Poultry Seasoning and Butter make your chicken soup sing, and Chef Paul says he loves it best with a light edge of garlic that enhances the savory richness of the broth - He says too much garlic is a sure sign of an amateur who has burned out their sense of smell, which is a very bad thing, because once you cannot smell things well, you can't taste them well either, and you may be serving up swill instead of food and never know why your guests don't like the food you make.
Pork - Poultry Seasoning and Onion, not too much Poultry Seasoning or it goes all to Sage and Thyme and isn't so good. Bay Leaf is also an enhancement with some types of Pork soup. Pork Boullion or Soup Base can also start you out with a deep roasty flavor that kicks the soup out of neutral. Breakfast Sausage contains a flavor of it's own, and is a great soup starter, and one of the easiest ways to use Pork. We use Lipton Onion Soup Mix to season a Pork Vegetable Soup, along with the usual Poultry Seasoning and more Onion, and it gives it a nice deep savory flavor, and is our favorite for simple Pork Soup.
Turkey - Same as Chicken.
Lamb - Treat like Beef but go more gently on the tomato and seasonings. Lamb has a brightness and savoriness of it's own. Make sure the lamb is NOT a Muttony Lamb (or it will have a heavy stale taste to it).
Mutton - Treat like beef, but add MORE Onion and Garlic, and a wider variety of vegetables, but NOT Turnips. Trim out ALL the Hard Fat in it, do NOT cook it into the soup, and this can really help reduce the heavy stale lanolin flavor of Mutton and make it more beefy. If it is Spring Lamb (still has a muttony flavor) you can season it like Pork or Beef. Can be nudged in a mellow direction with Bay Leaf also.
Veal - Treat like beef or pork, depending on how red it is (redder more like beef).
Seafood - Can go Boston or Manhattan in color (milk, or tomato). Light Poultry Seasoning, butter, onions and light garlic and a pinch of pepper will generally complement any seafood. CAUTION... sometimes onion conflicts with certain types of seafood, or in combination with other flavors. We do not recommend using Lemon and Onion together with stronger tasting fish, or AT ALL with Tuna, it will give it a Bitter flavor.
Venison - Treat like beef, but you may need to add more butter or bacon grease, and use a little stronger flavorings if it is gamey.
Pigeon - Treat like lamb, and pigeon loves red bell peppers.
Duck or Goose - Treat like Beef, but use heavier flavors to mask any gaminess or fishiness. A little stronger pepperiness can help also.
Smoked Sausage, Bacon, Ham - Goes well with Potatoes, but also with rice or beans. Onion, and Mir Poi are all you need here, but GENTLY on the salt because these already have salt.
Potato - Butter, Salt, and Onion, with milk and salt and pepper added is the classic simple Irish Potato Soup. It grows FAR beyond that, and we always add Mir Poi, Poultry Seasoning (just a bit), often Chicken Broth if we have it, and we thicken it with flour. We also ALWAYS add meat (ham, bacon, smoked sausage, breakfast sausage, or even hotdogs, etc), and often add corn. It can be anything from a light side dish, to a full hearty main dish.
Bean - Bean soups require the beans to be overcooked, to get the thickness and brothiness from the beans (and so we digest them well without indigestion). They work well with onions, bacon, ham, and other strong flavors, and a little heat complements them well. Bay Leaf is also a classic flavoring for bean soups. Remember, Great Northern and Cannelini beans are NOT the same as Navy or Small White - they have a stronger flavor, more like Kidney beans only less pleasant. Many people try to use them interchangeably and they do NOT taste the same, you can RUIN your recipe by using Great Northern or Cannelini beans instead of the Navy or Small White that you ought to be using. Pinto and Pink are the most inoffensive of beans for heavier flavors, with Small White or Navy being the standard for lighter flavored dishes. Garbanzos can be added to many soups, but Black Eyed Peas, and Fava beans should not be used unless you like their taste and know how to use them in a way that won't conflict with the flavor of the soup (and if you know you do not react to Fava Beans). Lentil and Split Pea soups are also popular, but remember, many people are allergic to Lentils. When you want just a little beans added to a beef or sausage soup, try Kidney or Black Beans. They have a stronger beany flavor that works well when you need just a little added to the dish. Tepary Beans are also a nice touch, and they cook faster since they are so small.
Cooking the Soup
First, make sure you only BARELY cover the vegetables with water or broth. Too much water to start means a thin soup in the end.
You have THREE choices to cook the soup...
1. Pot on the top of the stove. Fast and direct, takes about 45 minutes to bring it up to a boil and then boil it long enough to tenderize the veggies, so plan on it taking about an hour just to be sure. This is if you use COOKED meat in it. If using RAW meat, you'll need to let it simmer for about 2 hours. If cooking raw Beans, it can take longer. You MUST pay attention and STIR this every 15 minutes or so, or IT WILL STICK to the bottom of the pot, and can scorch.
2. Crock Pot on High. Takes about 4-6 hours, can be done without stirring it or being there to watch it as long as you know you have enough liquid that it won't dry out. Takes 8-10 hours on low - this means you can make soup OVERNIGHT, While You Sleep! Either way you can put in RAW meat, and it will cook.
3. Instant Pot. Run it on a Soup Cycle. Fast and you don't have to stir it. Takes about 15 minutes at pressure if you have to set the time on the soup cycle, or about 20 minutes if the Meat is Raw.
Clam Chowder And Seafood Bisque
Clam Chowder and Seafood Bisque (including Lobster Bisque) are similar dishes, with similar seasonings, and just a few differences. We'll start with Chowder, and then tell you how to modify it into a light and tasty Bisque.
I've been making chowder ever since I left home. My mother made clam chowder once in a while, but it was just an Irish Milk and Potato Soup with Clams - traditional in some areas. I wanted Skipper's chowder. I haven't quite achieved that yet, but I make a mean chowder that really satisfies. My mother is shocked. For her, Potato Soup or Chowder is poor food, made with a minimum of ingredients. For me, it is soul food. Comfort food. Hearty food.
Now, in our house, there is only ONE KIND of chowder. It is the WHITE KIND. New England Chowder RULES. I've never even TRIED Manhatten Clam Chowder, the thought of tomatoes in there just kinda turns me off. And hubby doesn't like tomatoes in his soup.
Clam Chowder
- Good Clams - Ok, so you need four small cans or two large ones... but they are mostly JUICE. So I'm telling you GET CLAMS, and as much as you can. LOTS OF CLAMS makes better clam chowder. You can use salted water to replace clam juice in most recipes, but I don't count it - put it in if you have it, it is offset by water.
- Potatoes - At least 4. More if you make more chowder.
- Onions - One big, or more. Chopped fine.
- Celery - A good cup or two of chopped celery and leaves.
- Carrots - Shred up 1 or more good sized carrots.
- Chicken Broth - 2 cans, or equivalent boullion.
- Dried Parsley - 1-3 tsps, depending on how much you like (adds a tangy flavor).
- Redmond Real Salt Seasoning Salt (1/4 to 1/2 tsp - not a lot) - This is an HERBED seasoning salt. If you don't have it, add a pinch or two of poultry seasoning, and some garlic salt.
- Pepper - A light dusting, or heavy dusting, depending on how much you like pepper.
- Salt - to taste.
- Water - just enough to ALMOST cover the chunky stuff - do NOT let it go swimming.
Put all that on to boil. Let it boil until the potatoes and other veggies are tender.
- Melted Butter - 1 stick or more. Real and salty butter, ok?
- Milk - 1-3 cups
- Flour - Estimate the liquid. 1 tbsp flour per cup.
Mix the flour into the butter to make a white roux.
Add the MILK to the soup.
Add the flour and butter to the soup.
Bring to a boil, and stir continuously while the soup thickens. You can adjust with more white roux to thicken it more, OR you can add more milk to thin it a bit.
Test for salt, and make this taste OH, SO SAVORY.
Ok, so a Bisque is both simpler, and stranger. If you can make a good chowder, you can make a great bisque, but remember it is somewhat thinner.
There are two kinds of Bisque - a New England, and a Boston. Again, we have that milk versus tomato going on, and some people just open a can of Campbell's Tomato Soup, thin it down, and toss in the shrimp or Crab. But I won't go there, I think there's just something more delicious!
Seafood Bisque
- Seafood - Again, a lot. Shrimp, that Krab stuff, Crab, Lobster, Crawdad, Scallop, Clams, or anything else you can get your frog knife into. (That instruction came from Forrest, straight from Bubba Shrimp.)
- Onions - about 1 large, chopped fine
- Celery - Several ribs, WITH the leaves, chopped fine
- Chicken or Fish Broth - 2 cans, or equivalent boullion
- Dried Parsley - 1-3 tsps, depending on how much you like (adds a tangy flavor).
- Redmond Real Salt Seasoning Salt (1/4 to 1/2 tsp - not a lot) - This is an HERBED seasoning salt. If you don't have it, add a pinch or two of poultry seasoning, and some garlic salt.
- Pepper - A light dusting, or heavy dusting, depending on how much you like pepper.
- Salt - to taste.
- Cocktail Sauce - 1-2 tbsp.
- OPTIONAL - Cayenne pepper, at your own risk
- Water - just enough to ALMOST cover the chunky stuff - do NOT let it go swimming.
Put all that on to boil. Let it boil until the celery is tender. (Gourmands add the fish last, AFTER the veggies are tender. Cookery Slop Artists just throw it on and cook the life out of it and hope for the best, and usually get a GREAT flavor.)
- Melted Butter - 1/2 a stick or more. Real and salty butter, ok? This is a THINNER soup, so it won't suspend as much butter as the chowder.
- Milk - 1-3 cups - Again, enough for a thinner soup.
- Flour - Estimate the liquid. 2 tsp flour per cup.
Mix the flour into the butter to make a white roux.
Add the MILK to the soup.
Add the flour and butter to the soup.
Bring to a boil, and stir continuously while the soup thickens. You can adjust with more white roux to thicken it more, OR you can add more milk to thin it a bit.
Test for salt, and make this taste OH, SO SAVORY.
This should be THICKENED, but it should NOT round up on the spoon. It is not a thick STEW type chowder, it is a thinner more brothy white gravy style (like Bechamel).
Tasty, Digestible, Aoudad (Canning and Preserving)
The first Aoudad we were given was so tough we could not even eat it after we ground the roasted haunch and made it into a spread for sandwiches. We COULD, however, can the meat and eat it, and we could grind it and it was not too different from hamburger (needs more salt - a lot more salt - and it needs some Soy Sauce to get that rich deep meaty flavor).
The second one is even tougher. Too much silverskin, and when we canned it, it shattered like wood splinters.
Aoudad is notoriously dry, tasteless, and tough. I mean not just chewy, but something you work on until your jaws tire if it is not a young and tender one, and even then, tougher than venison.
So what to do? It is the meat we were given, and we NEEDED the meat.
This is what we did, and what we discovered!
NOTE: If you have a tough old beef, or moose, or elk, or even some chewy deer or antelope, this method works for those as well.
My meat grinder would not grind Aoudad like it does venison. Not strong enough. I knew we'd not be able to shove that tough and stringy stuff through the cutting dies without it getting wrapped around the auger and bound up.
So first of, we cut it up into 1" chunks. (If you have an even WIMPIER grinder than I did, like the one we used BEFORE this one, then you'll need to cut it in even smaller pieces. If you have a Back To Basics, like my first real meat grinder, then you can do barely larger pieces than 1". If you have a tough workhorse, then you can probably do 2" pieces.)
Second, I used a 1/4" die on my meat grinder.
It worked marvelously! We ended up with a medium texture ground meat that went through the grinder pretty easily. I packed that into the freezer, and proceeded to think about how I could use it.
The first thing I tried was Chili Soup. I was afraid to make chili with too much meat in it, if the meat was Aoudad, so I made the soup, so there was less meat to wrangle over, just in case.
Your favorite Chili recipe, thinned out a bit, with about 2 cups dried beans, and 2 lbs meat, to make about 5-6 qts soup.
I always make the Chili or Soup for dinner, then can the leftovers.
We ended up with 10 pints of chili soup, and you just can't tell that it is Aoudad in there, it tastes like beef.
Next I tried cooking the Aoudad for spaghetti. I put 4 lbs of Aoudad burger into the Instant Pot, put 1 cup of water in the bottom, and then poured a can of tomato over the top. I then PRESSURE cooked it on the longest and hottest cycle my pot allows - maximum pressure, for about 50 minutes.
When it was done, I broke it up, and mixed half of it with spaghetti sauce, and the other half I made into a well cooked vegetable beef style stew, about 5 qts. We had the soup for dinner and canned up the leftovers.
Again, I cannot tell that it is Aoudad in there, and it canned up just great.
The spaghetti was the same. It was just good spaghetti.
I tried some Aoudad that was pressure cooked with tomatoes, to make Hamburger Helper. I won't do that again. It was not beefy, more gamey and chewy.
Then we got a call. Did we want an elk? Did they really have to ask? Only the freezer is FULL!
Have to empty it out.
So I cooked up 5 lbs of Aoudad, with tomato over it, and used 8 jars of spaghetti sauce, plus about 5 cans of the most nasty peely stewed tomatoes I've ever seen - the flavor was good, but the tomatoes had skins on (this was a national brand, bought on sale during a case goods sale, so of course I have plenty of the terrible things). I blendered the stewed tomatoes, which took out the sweetness from the spaghetti sauce just perfectly.
Filled the jars halfway with cooked Aoudad, and then filled the rest of the way with sauce. Canned that. Ended up with 12 jars of canned meaty spaghetti sauce. The meat is tender and almost indistinguishable from beef.
I had too much broth and some tomato juice that I'd drained off the stewed tomatoes so they would not be too soupy, so I cooked up another batch of Aoudad, another 5 lbs with tomato over the top.
When that was done, I broke it up, and put it into 4 quart jars, and then added the tomato broth from both batches. I ended up with the equivalent of ground beef with broth, for soup starter.
NOTE: The ground aoudad that I canned in tomato and aoudad broth was good, but it tastes like ROAST BEEF, and not like hamburger. Be aware, it will have a rich beefy and tomato flavored broth, and it kinda ruins goulash, but it does work well for soup or stew, or for anything else you'd use Roast Beef in.
I'll do two more things, and maybe they will work, maybe not.
I'm going to make Goulash Starter, with cooked ground meat, onions, blendered stewed tomatoes, and corn.
I'll also open the jars of plain canned Aoudad that I canned up this year, add some tomato sauce, and then re-can them. I short cycle can raw meats, to keep them from being overcooked so badly I cannot eat them, so I should be able to get away with this.
I won't use Aoudad, or other tough meat in a Sloppy Joe or a Taco or Burrito meat, because there's just too much concentrated meat there, and the gaminess just doesn't blend out like it does in foods with a lower concentration of meat.
The big secrets I learned about Aoudad are:
1. Pressure cook it.
2. Cook it or can it with TOMATOES on it, and use it in recipes with tomatoes.
3. Salt it good, it is a very low salt and tasteless meat otherwise.
4. If you need some more savory flavor, use Soy Sauce to deepen the flavor.
5. A little Redmond Real Salt Seasoning Salt rounds out the flavor amazingly.
If you've never eaten Aoudad, you'll have no idea what I'm going on about. If you have, you just WON'T believe how good it is when you get it done right.
Lasagna Madness
You can't help but love Lasagna, and we sure do. We make several kinds, and we hope you love them as much as we do .
First, we have good old fashioned basic Lasagna and it has several variants. But it starts with the same recipe, with some alternate ingredients to change up the flavor it you like.
Pre-Layer 1 in a large and DEEP 9X13 cake pan.
1 can of tomato sauce, poured in and spread around.
Layer 1
Three lasagna noodles (any kind, either pre-cooked, or oven ready), laid out in a layer.
Layer 2
1 lb cottage cheese with 1 egg stirred in, and 1/4 cup parmesan, and 1 tsp dried parsley stirred in. Spread that on the noodles. NOTE!! There are two layers like this, so you need TWO cartons of cottage cheese, three if you like LOTS of the white cheese layer.
Layer 3
1 lb hamburger, cooked with 1 small chopped onion. You can use Italian sausage, or you can add fennel and garlic.
1/2 jar spaghetti sauce - mix this in with the hamburger.
Blop this over the cottage cheese layer.
NOTE!!! There are two layers like this, so you need to DOUBLE this for the entire recipe, and use HALF for this layer.
Layer 4
1 lb mozzarella cheese, shredded - load that onto the meat and sauce layer.
NOTE!!! There are two layers like this, so you need a total of TWO lbs of mozzarella for the entire recipe.
Layer 5
Three more lasagna noodles, laid out on top of the cheese.
Layer 6
A second layer of cottage cheese filling - yes, you need another entire lb of cottage cheese.
Layer 7
A second layer of hamburger and sauce.
Layer 8
That other lb of mozzarella, and top that with some Parmesan cheese.
Bake for about 1 hour in a 375 degree oven.
So that is Lasagna. There are all kinds, but there are basically either THREE or FOUR layers.
Variations
1. Chicken Lasagna - sub chicken for the beef.
2. Alfredo Lasagna - sub chicken, pork, or shrimp for the beef, and Alfredo Sauce for the Spaghetti Sauce.
3. Pork Lasagna - Sub ground or cubed pork for the beef, add 1 tbsp vinegar and 1 tbsp sugar to the sauce.
4. Mexican Lasagna - Sub taco seasoning and tomato sauce for the spaghetti sauce. Use flour or corn tortillas instead of the noodles.
5. Pesto Lasagna - Sub Basil Pesto for the spaghetti sauce - it takes LESS Pesto than spaghetti sauce. You can also put the Pesto in a layer of its own on top of the cottage cheese layer, and then use Alfredo or tomato sauce with the meat layer.
6. Veggie Lasagna - We only like this with meat. Just add spinach to the cottage cheese, or other veggies in between. Soft pan fried fennel bulb is awesome on top of the cheese layer.
7. Ham Lasagna - sub ham for the meat, white sauce for the spaghetti sauce, and potatoes or rice for the noodles, or just keep the noodles if you like.
8. Meatball Lasagna - Use meatballs instead of the hamburger, and you can sub curly noodles or penne for the lasagna noodles.
9. Ravioli Lasagna - Layer Ravioli into the pan instead of lasagna noodles.
10. Breakfast Lasagna (no egg) - Layers are Grands Layered Biscuits, pulled into three layers, and laid onto the bottom of the pan, then breakfast meat (most any kind - bacon, smoked sausage, breakfast sausage, ham, smoked turkey, spicy chicken, chorizo, taco meat, thin shaved steak, etc), white Country Gravy, then shredded cheese, then another layer of thin biscuits, meat, gravy, and top with more cheese. You can use a Drop Biscuit batter instead of Grands.
12. Corn Lasagna - Add corn to your meat layer, works with many kinds of Lasagna.
13. Eggy Breakfast Lasagna - Layers are tortillas, tomato sauce mixed with breakfast meat (NOT breakfast sausage, but smoked sausage, plain pork, chicken, beef, or taco meat), scrambled egg (with or without Country Gravy), Shredded cheese, and REPEAT.
14. Classic Breakfast Lasagna - Sub mild salsa for the spaghetti sauce, and add scrambled egg to the meat layer. Double the eggs in the cottage cheese layer. You can sub tortillas or layers of Grands biscuits for the noodles.
15. Poured Breakfast Lasagna - 1 cup white sauce for the pre-layer. Bottom layer is a poured biscuit batter (thin drop biscuit batter), layer of cheese, layer of breakfast meat (any kind or combination), poured layer of 6 beaten eggs with 1/2 cup milk, sauteed onion with red or yellow and green peppers, thickish layer of spinach, 2 cups white sauce, layer of cheese, layer of meat, poured layer of 6 eggs with milk, second layer of both kinds of veggies, and then a second layer of biscuit batter poured over the top, and a heavy layer of cheese. Bake at 375 for 1 hour and 15 minutes.
16. Yorkshire Pudding Lasagna - 1 cup milk, 1 cup flour, and 2 eggs, beaten lightly together. Melt 2 tbsp butter or bacon fat in a square cake pan, and then pour in the batter. Bake at 400 for 20-25 minutes, and then top with cooked breakfast meat with cooked diced onion, white gravy, and a heavy layer of cheese. Return to oven for 10 minutes.
17. White Chicken Lasagna - Sub chicken for the beef, and white gravy for the spaghetti sauce. Add sauteed onions with the chicken. If you add a good seasoning salt to the chicken, or to the gravy, this tastes much better.
18. Potato Lasagna - Sub COOKED sliced potatoes for the noodles. Sub white gravy for the spaghetti sauce.
19. Cheesy Potato Bacon Lasagna - Sub cooked sliced potatoes for the noodles. Sub CHEESE sauce for the spaghetti sauce. Add Bacon bits to the beef layer.
19. Sweet Potato Dessert Lasagna - Sub sliced cooked sweet potatoes for the noodles. Sub vanilla wafers for the cottage cheese layer. Sub vanilla, banana, pistachio, or butterscotch pudding for the meat layer. Repeat layers, and top with crushed vanilla wafers. Dribble freshly made lemon pudding over the top.
20. Pizza Lasagna - Layer Pepperoni on top of the cottage cheese layer. Add olives, mushrooms, red and green peppers, or other favorite toppings over the meat and spaghetti sauce layer. Top with a heavy layer of mozzarella, and layer the top with more Pepperoni.
All The Tacos
Taco Meat is like Chili. It can be used in so many things. Here's a list of ideas to get you started.
If you make extra taco meat, you can get another meal out of it. Or two. It freezes easily in ziplock bags.
Taco Meat
- 1 lb hamburger, ground pork or ground chicken
- 1/2 cup diced onion (or 2 tbsp dried diced onion)
- 1/4 tsp garlic granules
- 1/4 tsp salt
- 1 TBSP chili powder
- 1/2 tsp ground cumin
- 1 can diced tomatoes, drained (save the juice for soup)
Toss everything but the tomatoes into a non-stick skillet, stir to blend the spices into the meat, cook on med-high heat until the hamburger is cooked through. IMPORTANT. Chili powder and cumin MUST be cooked in the food you are seasoning, or the flavors will not develop fully.
Taco Meat With Beans and Cheese
(Ok, so this is really just my Burrito Filling, but it works here too)
- 1 lb cooked Taco Meat
- 1 can refried beans, or drained whole beans
- 1/2 lb shredded cheese
Heat through and blend together, OR layer into a baking pan, and put in the oven for about 20 minutes at 375 degrees.
Biscuit Casserole - Use Taco Meat with Beans and Cheese, already heated through. Put in a square baking dish, and top with either refridgerator biscuits, or use 1 cup Bisquik blended with milk to make a batter (the consistency of cake batter), poured over the top. Bake until the biscuits are completely done.
Cornbread Casserole - Use Taco Meat with Beans and Cheese, already heated through. Put into a square baking dish, and top with 1 batch corn bread batter, bake until corn bread is fully cooked.
Taco Pie - Use 1 batch Taco Meat, or you can use Taco Meat with Beans and Cheese, either way, already heated through. You need 1, 9" pie pan with bottom crust, uncooked. Fill with HOT Taco Meat, and top with cheese. Bake at 400 for 15-20 minutes, or until crust is done. You can also do this with a top crust.
Red Pepper Taco Boats - You need 1 batch Taco Meat, Shredded Cheese, Sour Cream, Guacamole, Salsa, Olives, etc. Heat the Taco Meat with the cheese on top of it. Cut your peppers in half, and fill with Taco Meat and Cheese. Top with other ingredients according to personal taste. Serving size is TWO half peppers.
Taco Pizza - 1 Pizza Crust, with Tomato Sauce and a layer of Cheese, OR 1 Cheese Pizza. Top with 1/2 lb Taco Meat, Olives, Diced Tomatoes, Diced Onion (cooked or raw), Drained cooked Beans, or other Toppings. Layer another layer of cheese on, and cook at 375 degrees for 20-30 minutes (depending on thickness of Pizza). Lettuce is optional.
Taco Salad - All the good stuff piled on a bed of lettuce or spinach. Use Taco Meat, Cheese, Olives, Diced Tomato, Diced Avocado, Diced Onion, Tortilla or Frito Chips, Sour Cream, Salsa, Ranch Dressing, Chipoltle Dressing, etc. Be generous with the toppings on this and it is a heart, nutrient dense meal.
Taco Nacho - Same as Taco Salad, but on a bed of chips, or in a bowl with chips all around it on the plate.
Taco Dog - Use Taco Meat with Beans and Cheese. Spoon over a hotdog in a bun, and top with cheese, sour cream, salsa, etc.
Taco Pockets - Several ways to do this. You can use Pie Pastry, Bread Dough, or Biscuit Dough. Roll out the dough into a circle, fill with hot Taco Meat and top with cheese and any other ingredients you want, fold over and seal closed. Bake at 375 degrees for about 20 minutes, or until dough is fully done. You can use a large clamshell turnover press to make these.
Taco Ravioli - Make a simple Pasta Dough, and roll it out thin. You can use a small clamshell turnover press to make ravioli. Fill the Ravioli with either Taco Meat plus cheese, or with Taco Meat with Beans and Cheese.
Taco Tater Pie - Use Taco Meat with Beans and Cheese. Place in baking dish, and top with mashed potatoes, or with tater tots, or a layer of hash browns. Bake at 375 degrees for 40 minutes, or until potatoes are browned, or until hash browns are brown and tender.
TacoMale Pie - Mix Masa Flour with Water, to make a batter - it absorbs a lot of water, so you usually add water more than once to adjust, before you pour it into the pan. Put it into a square baking dish, and top with hot taco filling, and top again with cheese. Taco Filling may be either Taco Meat, or Taco Meat with Beans and Cheese.
Taco Guaco - Heat Taco Meat and top with cheese. Fill avocado halves with meat and cheese mixture, and top with sour cream and salsa.
Taco Soup -Use your leftover tomato juice from your diced tomatoes in this. You can make this from leftover Taco Meat, but you can also just throw in cooked hamburger. You need Meat, Onions, Garlic, Butter, Tomatoes, Chili Powder, Cumin, Salt, Salsa and Beans for the soup (add water to BARELY cover). Serve the soup with olives, cheese, sour cream, salsa, guacamole, tortilla or fritos chips.
Taco Sausage - Grind half pork, half beef and blend. Add diced onion, garlic, chili powder, cumin, dash of curry powder, Redmond Real Salt Seasoning Salt, and mix well. Fry a small amount and taste test. Adjust seasonings, and put in sausage casings, or pipe out without casings. Freeze. Serve in a bun, or cut up and fried with cabbage. Use in Mac and Cheese, or serve cooked beside eggs for breakfast.
Taco Tamale - Mix Masa Flour with water, to make a SOFT pasty dough (add water more than once, it absorbs a LOT). Smear the dough onto corn husks, or parchment paper squares. Lay a line of Taco Meat down the middle. Roll up. Steam for half an hour, OR can according to Tamale Canning instructions (careful, this one has to be done JUST RIGHT, or you'll have disaster).
Taco Breakfast Burritos - Sub taco meat for breakfast sausage in breakfast burritos. Good stuff!
Fried Taco Rolls - Stuff eggroll wraps with Taco Meat and Cheese, and fry until crispy brown.
Taco Pinwheels - Use refrigerator Crescent Roll dough, or Pizza dough, and roll it out into a rectangle. Cover with Taco Meat, and then with cheese, add tomato or onion. Roll up, and slice into 1" wide slices, lay them on a cookie sheet, and bake at 375 for about 25 minutes.
Taco Stromboli - Just like Taco Pinwheels, but we don't cut it. You can use a bread dough for this, rolled out into a rectangle. After you roll it up, you lay it seam side down on a cookie sheet, and bake for 25-35 minutes, or until it is done through.
Taco Tater Tot Casserole - This is best if you use 1 batch of Taco Meat mixed with 1 bath of Taco Meat with Beans and Cheese. Layer some more cheese over that, and top with Tater Tots (they are best if deep fried first... but we all know that). Bake until hot and browned on top.
Taco Mac - Mix Taco Meat with Macaroni and Cheese. Add tomatoes, or cooked onions if wanted. You just HAVE to enjoy THAT.
Taquitos - Roll taco meat and cheese in corn tortillas. Deep fry. You can use flour tortillas if you wish, and it is even better.
Taco Lasagna - Use flour tortillas in place of noodles if you want, but noodles work also. Layer Taco Meat, cottage cheese, Cheddar Cheese, Salsa, and Olives and Cooked Onions. Top with lots of cheese and bake until hot and until the cheese is browned.
Taco Burger - Use Taco Meat with Beans and Cheese instead of Sloppy Joe filling, and top with cheese and lettuce, and anything else that sounds intriguing and delicious on your taco.
Taco Sandwich - Just stuff all that taco goodness into Pita bread.
Taco Rice Bowl - Mix 1/3 taco meat with 2/3 cooked rice. Top with cheese and taco toppings.
Taco Taters - Taco stuffed baked potatoes.
Taco Mexo - Cornmeal mush spread in a baking dish, topped with taco meat, and cheese.
Taco Mexi Rice - Add 1 can diced tomatoes, 1 lb taco meat, and 1 chopped sauteed red pepper to 3 cups of Spanish Rice. Top with Cheese, and Sour Cream.
Make extra of that Taco Filling and you won't have to worry about what's for dinner.
Peasy Leeky Soup
I just kind of MADE this. Because I did not have all the ingredients I wanted for Split Pea Soup. It made a very thin savory and brothy soup that thickened as it cooled to a stew-like consistency. It is not pasty like most Split Pea Soup.
Get out that Instant Pot.
(Ok, so you can do this in a crock pot if you wish but it will take about 24 hours on high, with lots of stirring.)
- 1 lb dried split peas
- 4 qts water
Into the pot they go.
Run this on a long and hot bean cycle. My Midea has settings by the kind of food, so I don't have times and pressures, I just know this goes for the longest bean setting, and the highest pressure.
You should end up with split peas that are COMPLETELY DISSOLVED. They should be cooked until there is NO SHAPE left.
Throw in:
- 3/4 cups dried leeks, OR 1 small chopped leek (sub chopped green onion if you wish)
- 1/2 cup dried celery OR 1/3 of a bunch of celery, chopped
- 1/2 cup dried carrots or 2 large shredded carrots
- 1/2 tsp dried curled parsley
- about 8 good shakes of Redmond Real Salt Seasoning Salt
- a good sprinkling of sea salt (you can salt to taste later, but peas absorb salt)
- 1 lb or more finely chopped ham with the broth (can sub breakfast sausage, smoked sausage or other meat)
- 2 TBSP or more real bacon bits or 1/4 lb bacon (add the fat if you wish, I didn't have it)
- 1 stick butter
Run it again on the same cycle. No, it really won't burn, it is too thin. IMPORTANT! The vegetables need to be cooked really well, so go ahead and let it go long.
You'll end up with a really thin soup, which will thicken a lot as it cools. It thickens so much that by tomorrow it will be a medium thick Pea Soup that rounds up on the spoon.
You can pressure can this recipe, it is a thin enough soup to work well.
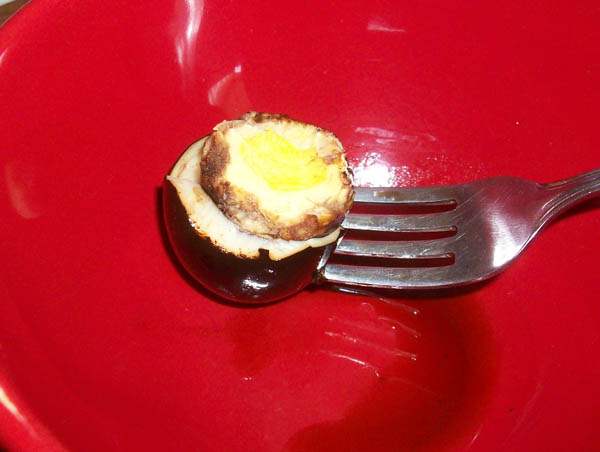
The Scariest Ever Delicious Pickled Egg!
I just HAD to try it. I LOVE pickled eggs, and I LOVE balsamic vinegar. So I did it.
I filled a Quart jar with about 1 1/2 cups of balsamic vinegar. I added about 2 1/4 cups of sugar. Stir and stir and stir and stir and it eventually dissolves.
Dropped in 12 peeled boiled eggs.
I lasted about a day before I tried one.
FREAKY!
The egg was already black on the outside, just barely. And shiny.
And just barely pickly delicious.
A day later, and the egg was TOTALLY BLACK on the outside.
The inside of the egg white was still WHITE! The egg yolk did not change color either.
So this is about the 6th time I've made these, and this time I forgot one in the fridge. It turned out a little different, the outside of the yolk also turned black. Weird. But the white is still very white inside.
This egg pickling mixture does some weird things.
The first time you use it, with fresh vinegar and sugar, it will absorb the FLAVOR all the way through, but the outside gets black, and the white stays white. Even if you let it sit for a week, it seems to do this, and the yolk will be flavored, but not colored.
If you reuse the brine, even if you add more vinegar and sugar, the outside won't get black, it will just get BROWN, and the white will turn light brown also. You still get the dark color outside and a light color inside, but they are more blended. The color will go all the way to the yolk if you let it.
You can add pickling spices to it if you want, but it tastes just great with only the sugar and vinegar.
I think these will be a real contender for Halloween.
NOTE: Balsamic Vinegar can give you a reaction. Kinda itchy, maybe swelly. But it usually does that on the FIRST exposure. The second exposure will be better, or worse, it can go either way. The third exposure tells you whether you should continue to have anything with Balsamic Vinegar (or at least with a LOT of it). If the third exposure is worse, don't use it again. If the third is better, then you are likely to stop reacting to it within 1-2 more exposures. Your body just learns how to handle it.
Sloppy Beyond Joe
Slop it on a bun. Or on a biscuit if you must.
First, a recipe for a really good Sloppy Joe sauce. Because we know the stuff in the can just ain't what it used to be (though we also know we USE it when we run out of time).
Sloppy Joe
2 cups red pepper
2 cups onion, diced
1 garlic clove, pressed or finely chopped
3 cups tomato sauce
6 tbsp tomato paste
4 cups beef broth
1/4 cup sugar
4 tbsp apple cider vinegar
2 tbsp soy sauce
2 tsp chile powder
3 tbsp butter
Put it in the crock pot and let it do its thing on low for most of the day. Add cooked ground beef when the vegetables are tender.
So what else can be sloppy?
- Sloppy Taco - You guessed it, taco meat on the bun.
- Sloppy Shepherd - Spread it out in a casserole dish, top with mashed potatoes, put some cheese on it, and bake. Works great with OreIda Butter and Herb instant mashies.
- Sloppy Stew - Takes a good thick stew. Don't forget the tomato in the stew, it is what makes the flavor bold.
- Sloppy Jose - Chili over the bun. Add some more meat if the chili is wimpy.
- Sloppy Summer Sausage - Requires a good summer sausage with some tang. Chop it up small, and put it in the Sloppy Joe sauce.
- Sloppy Clucker - Mix a can of tomato soup with your 2 cups of Sloppy Joe sauce. Takes about 4 cups of chopped chicken in that.
- Sloppy Gobbler - Turkey gravy, chopped cooked turkey, with drained diced tomatoes in it.
- Sloppy King - Gravy with meat in it, and drained diced tomatoes, plus mixed vegetables.
- Sloppy Rooter - Cook your ground pork with a nice sprinkling of Redmond Real Salt Seasoning Salt. DRAIN the fat (I know, but this time it matters). Add Sloppy Joe sauce.
- Sloppy Sailor - Manhattan clam chowder base, thickened with flour or cornstarch, with clams, scallops, shrimp, crab,, cod, or other seafood. Chicken or pork may also be added.
- Sloppy Deer - 1 pint jar of venison chunks, heated in 1 tbsp of butter until the juice reduces down, then add 1 can Sloppy Joe sauce.
- Sloppy Giovanni - Cooked Hamburger mixed with spaghetti sauce. Top with cheese just to be daring.
- Sloppy Barbie - BBQ beef, pork, or chicken on the bun, melted cheese over the top.
- Sloppy Spuds - Regular Sloppy Joe over Potatoes, or with Potato chunks stirred in. Works over hash browns also.
- Campy Joe - Sloppy Joe over biscuits.
- Pepper Joe - Sloppy Joe tucked into raw green, red, or yellow pepper halves, and topped with CHEESE.
If you won't enjoy it, don't eat it!
Awesome Swedish Meatballs (No Mushroom Soup)
Swedish Meatballs are kind of like Tamales. You ask how to make them and the answer is often "whatever you want" in them. There are all kinds of recipes. But I want a classic.
This is the simplest recipe I've ever found for this. Yes, you have to cook it. But that's why you came here in the first place, isn't it?
Swedish Meatballs
Meatballs (from recipe below, OR Homestyle frozen meatballs if you must)
Sauce (from recipe below)
Cooked Noodles - 1/3 of a 12 oz package of egg noodles, cooked, and hot
Meatballs
- 1 lb ground beef
- 1 egg
- 10 crushed crackers OR 1/3 cup oatmeal
- 1/2 tsp parsley flakes
- 1/4 tsp onion powder, or 1 tsp chopped dried onion
- sprinkle of salt
- OPTIONAL - sprinkle of seasoning salt (We use Redmond Real Salt Seasoning Salt, and it ONLY takes a sprinkle)
Mix together, shape into meatballs. Bake in 400 degree oven, 20 to 30 minutes, depending on the size of your meatballs.
Meawhile, back at the stovetop...
Sauce
- 2 cups milk
- 4 tbsp butter
- 4 tbsp flour (this can change, depending on the type and brand of flour)
- 1 large pinch parsley flakes
- Salt to taste
Put butter into a saucepan, melt. Remove from heat, add flour and stir it in well. Use a whisk and stir in the milk. Return to heat, and stir slowly, keeping the bottom of the pan constantly scraped. Cook until thickened and just bubbling while stirring. Remove from heat.
Add the cooked meatballs. DO NOT return it to the heat, it will just burn and be the worst Swedish Meatballs you've ever had.
NOTE: This is a classic recipe, the flavor is very smooth, almost but not quite sweet due to the milk. If you like a more savory sauce, you may use half beef broth instead of milk, or even water plus a little more seasoning salt. You may also add mushrooms if you like them. If you react to cooked milk proteins (they can cause indigestion in some people), then substitute ALL beef broth or water and just serve it with a butter gravy (yeah, that's a thing).
Southwest Bean Stew
A flexible stew that goes together fast. Can be done in a crock pot, or an instant pot.
MAKES ABOUT 4-5 QUARTS OF SOUP!
Don't leave out the cream of mushroom soup. It mellows the flavors and improves the taste of the soup.
- 1 can black beans, drained and rinsed
- 1 can pinto beans, drained and rinsed
- 1 can kidney beans, drained and rinsed
- 1 can corn, undrained
- 1 can cream of mushroom soup
- 2 cans cream of tomato soup
- 1 cup salsa
- 1 can stewed tomatoes, cut up
- 1 onion, chopped
- 2 carrots, shredded
- 3 ribs celery, chopped
- 1 lb hamburger or chorizo
- 1/2 stick of butter
- 1 TBSP chili powder (or more to taste)
- 1/2 tsp cumin (or more to taste)
- 1/2 tsp salt (to taste)
- sprinkle seasoning salt to taste
- 1 cup water
Break up the meat on the bottom of the pot. Pour the water over it. Put the beans and corn into the pot, and then dump the creamed soups over that. DO NOT STIR!!!
HEY! I SAID DON'T STIR IT! The meat needs to cook without being disturbed, especially if you are doing this in an instant pot.
Add the rest of the ingredients.
Cover, and cook either on low for 8 hours, or on high for 4 hours if using a crock pot, or on medium pressure for about 20 minutes if using an instant pot.
Substitute ingredients if you like, it is very flexible. As long as you have the condensed soups in there, and the beans and meat, and seasonings that work well together, it will turn out. We've done this a number of ways.
Serve with cornbread, biscuits, or cheese toast.
VARIATION: Use Cream of Chicken soup instead of tomato, and cut up chicken instead of the hamburger.
CAN THE LEFTOVERS USING THE SAME TIME AND PRESSURE AS CHILI.
Easiest Chicken White Bean Chili Ever
Put this in a crock pot, heat it up and let it simmer for an hour or so, to meld the flavors really good. Easy as it gets.
- 4 cans or home canned jars of cooked white beans.
- 4 cans of cooked chicken, or 1 pint of cooked chicken.
- 1 - 16 oz jar of green salsa
- Salt
Optional - 1 tbsp chili powder, 1 tsp garlic granules, 1 tsp cumin, 2 tbsp lime juice
Top With - Sour cream, cheese, olives, etc.
This works GREAT as a sauce for burritos.
Seven Siblings Knockout Corn Chowder
(Or, The World's Best Tasting Healthy Potato Soup)
This is an all day project. It is the easiest way to make a really thick and scrumptious soup, but it takes all day, because the pot does so much of the work for you.
REMINDER - This chowder is made with VERY LITTLE WATER. The potatoes are cooked separate to make sure that it is THAT THICK. If you cook the potatoes with the other vegetables you will have a SOUP, and not a STEW LIKE CHOWDER. So if you want it SUPER THICK, cook the spuds separately.
5 lbs potatoes
Wash them, and put them into the instant pot with ONE AND A HALF CUP of water. Run it on the lowest pressure setting, for about 10 minutes. Alternately, you can bake them, or even boil them, but boiling them will kind of defeat the purpose of making this easy.
When they are done, take them OUT of the pot, and set them somewhere to cool. You can put them in the fridge overnight if you want, I just pop them into a ziplock bag.
After they cool, peel them and chop them into chunks.
1 lb bacon
Lay it out on a cookie sheet. I have LITTLE cookie sheets, so I have to put it on two pieces stacked, all the way across, but lay it out however. Put it in the oven, at 400 degrees, for 20-30 minutes. Thick bacon can take more, and if you have to stack bacon, it can take more time also.
Once it is done, take the bacon out of the grease, and let the bacon cool enough to snip it up (scissors are easiest). Don't snitch. Much.
SAVE THE GREASE. YOU NEED IT.
5 ribs celery, chopped
4 carrots, chopped
2 onions, chopped
2 cans chicken broth
2 pkgs smoked sausage, sliced up (Oscar Meyer Smokies do in a pinch)
1 lb frozen petite corn
1 srick butter
You can do this part in an Instant Pot, or in a crock pot. Run it on a low pressure, short setting in the instant pot, OR put it all in the crock pot, and put it on high for about 4 hours, or low all day, but you need about 2 cups more water if you do it in the crock pot (you need just enough liquid to barely cover the veggies, don't put them to drowning).
Put all those ingredients in. You need to cook them until they are tender.
DON'T add too much water! We do not want to have to drain any off.
The potatoes can be added as soon as everything else is cooked, but NOT BEFORE! It takes too much water if you do, and you don't get a really loaded stew.
Let the potatoes get hot. That means leave it in the crock pot, OR, run another short low cycle on the instant pot.
DON'T ADD MORE WATER!!!
1/3 cup flour (1/2 cup if you had to add water in a crock pot)
Reserved bacon fat, melted (can sub another stick of butter if you must)
I told you that you would need that bacon fat. This is how you get your thickening silky smooth. Mix the flour with the reserved bacon fat. All of it.
STIR this into your vegetables, as soon as the potatoes have heated up and the soup is bubbling.
2 cups milk
Salt to taste
Add the Milk RIGHT AFTER you put in the flour, you'll want to keep it from turning to glue.
Let it heat until it is thickened. If it is in the crock pot, stir it every 15 minutes or so (it takes about 30-40 minutes to thicken and bubble again). If it is in an instant pot, put it on the Sautee setting, and let it heat, stirring every few minutes - CAREFUL, it CAN, and DOES burn if you do not keep it stirred.
Salt it to taste, and serve it up.
You can add CHEESE, either in the pot, as the LAST THING, AFTER it is thickened, OR at the table, in each bowl as you serve it.
Substitutions:
You can use dried veggies, and even dried potatoes.
You can use any kind of smoked sausage, even the stuff with ammonia in it because it WILL cook out. We like Falls Brand Smoked Sausage (the BEST, but they really are smoky!), Cloverdale Smoked Sausage, Oscar Meyer Smokies, or even Great Value Smoked Sausage. We don't usually eat Hillshire Farms, Johnsonville, or some other national brands, they have too much ammonia in them, but they will work for this, you just don't get flavor that is as good. Don't let them kid you that if you tell the truth about their product that they can sue, it is not libel or slander if it is true, and at the date of this printing, it is absolutely true. Hey. all you guys who think ammonia has a place in the processing of food, the challenge is on. If your food really is that good, or if you got a clue and it is better now, tell me, I'll test it again! 'Cause really, food is all about what REALLY tastes good, and I am not about to lie about that!
This is really good with venison summer sausage, or pork breakfast sausage subbed for the smoked sausage, with or without the bacon, but if you leave out the bacon you really miss the bacon fat in it.
If you HAVE to, you can sub about 1 cup of REAL bacon bits PLUS 1 stick of butter for the fresh bacon. It isn't as good, but it works in a pinch.
DON'T substitute margarine for butter. The flavor just isn't there, nor is the health benefit. Your body just does not know what to DO with vegetable oils once they've been extracted, nearly so well as it knows what to do with butter and bacon fat, animal fats are ESSENTIAL for nerve and endocrine health! You don't need all that hexane either, your body REALLY doesn't know what to do with IT. (Remember, foods that your body cannot USE well just get stored as fat, and chemicals either leave a trail of damage through you as they exit, or they get caught and stored in fat cells or other cells, and mess up your metabolism, just like ammonia does.) It is about a quarter water anyway, and there's no point adding more water!
Admit It, You Eat Ramen Noodles!
We all do! They are cheap, and fast, and easy.
And we all feel guilty when we do! Even if we love them.
Well, I USED to feel guilty, but I don't anymore.
While the white noodles are probably never going to win nutritional awards, if you put them together right, Ramen can be a good, fast, go-to when life gets hectic.
Turns out, we may be craving them because our digestion is a bit wimpy and the white flour is easy to process, or we may be craving good old MSG in a form that we can convert into those essential neurotransmitters and inhibitory neurotransmitters more easily.
I've recognized that if I crave them, there is probably a reason, and I tend to go through phases, and only crave them when I've been toxed by airborne toxins that throw my metabolism out of order. But much experience shows that EATING them gets me over the metabolic crisis FASTER than if I avoid them. Weird, but true!
So go ahead and eat them. But don't hold back on the goodies!
1. Get good noodles. It's gotta be Maruchan! At the time of writing, they have the best seasoning packet, it has a form of MSG that is easy to convert into glutamic acid. Read up on Glutamate in this article. Maruchan are one of the lowest cost noodles also, if you buy them in the 12 pack. They cost less than most others on sale if you shop around a bit. No, I'm not overlooking Top Ramen... I can always get Maruchan for a similar or lower price.
2. Soupy or Solid, Ramen tastes great. Prep them with water and the seasoning packet - use about 1 1/2 cups water, and don't drain it. Otherwise, you can cook the noodles, drain, and then put the seasoning packet on over, no water.
3. Butter is Better. Soupy or solid, Ramen tastes better with generous amounts of butter!
4. Spice it up! You can add a little seasoning salt (Redmond is best!) or some onion powder for extra flavor. A pinch of cayenne or black pepper, or a hot seasoning sauce also works. If you add powdered seasoning, or even curry powder (yum), then you need to add them during the cooking so they cook with the noodles.
5. One egg per packet. The easiest way to add protein and turn it into a full meal is to add an egg. Cook the noodles until they are soft enough, crack the egg into the noodles and water and stir gently to blend the egg in with the noodles. Egg drop Ramen soup, or eggy noodles without soup.
6. Veggies perk it up. I use peas a lot, but onion, fresh peppers, frozen or canned corn, or other veggies are easy to add.
7. Tuna, chicken, beef, shrimp, or other cut up meat goes well in Ramen, and makes it a nutrient dense dish. Oscar Meyer Smokies hotdogs are really good sliced up in it also.
8. Sesame Oil is the Ultimate Upgrade! Toasted sesame oil (the yellow bottle, people!). This stuff is so good on Ramen, but sesame oil has a catch to it. Too much, and you will hate it - it will be bitter. Too little and you won't taste it. The gotcha is that the longer you cook it, the weaker the flavor. So if you cook your Ramen in water and add the sesame oil early, you need about a third of a teaspoon of oil. If you drizzle it onto drained noodles with the butter at the end, then you need a little less than a quarter teaspoon of oil. If you accidentally get too much, cook it a little longer. I don't know what it is about sesame oil that is so good, but long term use, and paying attention to patterns in my craving for it suggest to me that it may help with neurological health, and that perhaps my body can more easily use this oil (even in tiny amounts) to repair damaged nerve tissue. This stuff is so good with Chicken or Shrimp Ramen noodles that you'll never get over it!
9. So Cheesy. Cheese works, but it clumps the noodles together. Tastes really good, it is just awkward.
10. Don't fix them dry. Seriously. Dry Ramen is raw noodles, and uncooked flour just does not digest well. You don't get the full nutrition from it, and Ramen alone has little enough of that as it is! So cook it for best nutrition - you don't like that nasty crunchy salad that pokes the roof of your mouth anyway, do you?
Ramen with egg, butter, and sesame oil is probably my all time favorite way to prepare this fast food. It is filling, and very tasty, and when life is battering me, it provides just enough glutamate to head off neurological disaster (I get low on GABA very easily).
Who knew Ramen could actually be useful for something besides feeding starving college students and Mormon missionaries?
"We don't eat Ramen noodles like this in California."
"No, in California you can't afford to put peas in your Ramen."
Family Pizza
One of the best memories our family has is making pizza.
Why?
Everybody makes their own.
Do this however works for you.
- Big ones for grown ups, small ones for little kids. Works best if you have enough dough and ingredients for leftovers (somebody always eats all of theirs, but that is their choice - everybody gets enough for two meals in our house).
- Assemble the ingredients together - shredding cheese, chopping olives and peppers, cooking the beef or sausage, and getting all the other yummy stuff out is part of the work together time that goes with making pizza.
- Use homemade dough, or premade dough. You can use Digorno, or Freshetta pizzas and add more ingredients, or start from scratch.
- We always gave everyone the same ingredients. If they did not like some, they'd swap, or give away what they did not want.
Your pizzas can be ultra healthy, half quickfix, or somewhere in between. The only thing that is important is that everybody gets to customize theirs.
We did this most often on Sunday afternoons, when everyone was home, the day was lazy, and the activity was as important as the meal.
We love homemade pizza.
Nuthin' Better!
Muddy River Coleslaw
The BEST tasting coleslaw in the world!
Ok, so it looks really questionable.
But it tastes so good that you'll tell people WHY it looks so odd.
Balsamic Vinegar makes this richly tart, and it makes all the difference in flavor. Marination of the cabbage pulls the flavor all the way through the cabbage. You won't have cabbage with dressing on it - you will have sweet and tart cabbage that tastes like coleslaw instead of like cabbage with Miracle Whip on it.
Muddy River Coleslaw
- Chopped Cabbage
- 1/2 cup Balsamic Vinegar
- 1/4 to 2/3 cup sugar (you have to TASTE it so you get it right)
- Mayo (you'll know when it is the right amount)
Put the vinegar in a bowl that is large enough to hold the cabbage and stir it.
Add the sugar - add some, stir it until dissolved. Taste. Add more if you need it, repeat.
Dump the cabbage in, and stir to coat it.
Let the cabbage marinate for 3-6 hours, stirring occasionally to re-coat the cabbage. Doesn't matter if it is in the fridge or not, unless it goes overnight - but be careful if you leave it on the counter, and cover it, so fruit flies do not invade.
If you want to make sure it has marinated long enough, taste it, to make sure the flavor is all the way through.
Add mayo, a spoonful at a time, and stir it in. You'll know when it is creamy enough.
Looks terrible, right?
Tastes wonderful though.
If your guests REALLY can't bear the dark color, you can sub Cider Vinegar, or even Distilled Vinegar if you must. But it won't taste as good!
NOTE: Balsamic Vinegar can give you a reaction. Kinda itchy, maybe swelly. But it usually does that on the FIRST exposure. The second exposure will be better, or worse, it can go either way. The third exposure tells you whether you should continue to have anything with Balsamic Vinegar (or at least with a LOT of it). If the third exposure is worse, don't use it again. If the third is better, then you are likely to stop reacting to it within 1-2 more exposures. Your body just learns how to handle it.
Salisbury Steak WITHOUT Mushroom Soup
Oh, don't get me wrong! We have mushroom GRAVY. But we do not use mushroom soup with Salisbury Steak. That would be a desecration.
This meal seems like it is involved, but once you get it down, it is pretty easy to do. I don't rush, it takes me about an hour.
I start my rice or potatoes before I start the meat, but I start noodles later in the process.
Step 1 - The Meat
- 2 lbs of good ground beef (whatever you think that is!)
- 2 eggs
- 1/2 cup of cracker crumbs, bread crumbs, or quick oatmeal
- 2 tsp dried parsley
- 1/2 tsp salt
- a few shakes pepper if you want
- 1/4 tsp of Redmond Seasoning Salt (if desired -or other seasoning salt if you are that kind)
Throw it all in your KitchenAid mixer (no, a Bosch will NOT do!!! Just kidding). Blend the ingredients together. Use your hands, or a wooden spoon if you don't have a mixer, we are flexible like that, but make sure you get it out from under your fingernails - this is why I use a wooden spoon if I do not have a mixer!
Step 2 - The Steaks
- 3 TBSP Butter (NOOOOOooooo! Not the Margarine!!!!! Sorry, just had to get that out of my system.)
Form 6 or 8 (seven is not allowed) patties. They should be about 1" thick.
Melt the butter in a large skillet. Put in a round of patties (these are the steaks if you didn't figure that out). My 10" skillet will hold either three 1/3 lb, or four 1/4 lb steaks. My larger skillet will hold six or eight.
Cook the steaks until they are not bleeding aggressively (done mostly through). Don't worry if they bleed while you make the gravy, they will cook more in the fourth step.
Put them on a plate and set them aside.
Step 3 - The Gravy
- 6 TBSP Butter
- Mushrooms - 1 can (drained), or about 4-6 chopped criminis, or any other kind of mushroom you want to put in this - savory ones are best, just chop them up however large you want them (wild ones are great, and dried straw mushrooms or dried Porcini work wonderfully).
- 6 TBSP Flour
- 4 cups water (you filtered it, didn't you?)
- 2-3 tbsp soy sauce
- Salt to taste
- Pepper if you must
Melt the butter in the skillet, then add the mushrooms. If the mushrooms need cooking (canned ones don't), cook them until they are as done as you like them.
Remove from heat, and then add the flour. Whisk it until it is smooth (ok, so the mushrooms won't be smooth, but the gravy should be!).
Add the water, about 1/4 at a time, whisking until smooth after each addition (you did remember the bit about the mushrooms, didn't you?).
Return to heat, and stir gently until it is thick and bubbly. When flour thickened sauces or gravies are done, they'll be evenly darker and evenly thick.
Stir in the soy sauce and salt. We add the soy sauce last so we can taste test and get it balanced just right, because mushroom and meat flavors can vary some, and the soy sauce kinda ties them together and enhances the meaty flavor.
Step 4 - The Finish
Return the steaks to the skillet, with the gravy.
NOTE: If your skillet only holds HALF the steaks at a time, you need to REMOVE half the gravy and do a second round.
Turn down the heat to a gentle simmer, and COVER the skillet.
Let simmer for about 10 minutes, checking and stirring every few minutes. TURN the steaks at least once.
IF THE STEAKS ARE STILL BLEEDING THEY ARE NOT DONE! Repeat covering and simmering.
Serve with Rice, Noodles, or Mashed Potatoes.
This makes GREAT leftovers, and it can even be frozen for later use. This is why I make a larger batch, even though our family is now small.
I tried canning this, and it DID NOT WORK. The flour threw the flavor off, giving it a kind of dark bready flavor, and I would not do it again. I've tried other things with whole wheat flour, and it is even worse.
I will be trying this one with corn starch. It does separate, but can be shaken or stirred back together.
Light Split Pea Soup
Corn in the soup mellows the flavor and rounds out a nice nutritional profile. Lots of bacon gives it plenty of pop, and provides some lovely fats and proteins.
I NEVER blend my split pea soup. I simply cook it until it is creamy. Just sayin'.
This soup is THIN on the first day, but thickens if leftovers are saved in the fridge, or if it is canned.
- 1 lb dry split peas
- 2 qts chicken, rabbit, or ham broth
- 2 onions, chopped
- 4 carrots, shredded
- 4 ribs celery, finely chopped
- 1 can creamed corn (can be added at the very end if you blend the soup but want texture of the corn)
- 1 lb bacon, cut into small pieces
- 1 tsp Redmond Real Salt Seasoning Salt
- 1 tsp salt
- 1 stick butter
Optional (pick and choose):
- 1 red bell pepper, chopped (will change flavor)
- 2 shredded potatoes plus 2 cups water (mellows the flavor)
- 1 cup dry ditalini (short straight macaroni) pasta plus 1 1/2 cup water (add at the end of cooking time)
- 1 clove garlic, minced or mashed (will change flavor)
- 3 parsnips, shredded
- 2 turnips, shredded (will change flavor)
- 1/4 jicama root, shredded (will need to blend soup if this is added)
Method 1 - Crock pot this, all day, on high, until you cannot recognize the shape of the peas, and they fall apart when it is stirred. Needs a 6 qt pot. By this time the onion, carrot, and other veggies will do the same thing. May need to add additional water halfway through. If you add pasta, cook for another half hour.
Method 2 - Electric pressure cooker - high pressure, about 1 hour (longest bean setting at highest pressure works). Let it cool to release the pressure, do not fast release, it helps it cook just a little more. If the peas are not easily mashed, put it back for a short cycle. If you add pasta, cook on the shortest rice setting with lowest pressure to cook the pasta.
You can blend the soup if you want, and may want to if you add jicama, or if you want the corn blended in, or other veggies smoother.
Add a little extra water if you can this. Can at 10 lbs pressure, adjusted for altitude, for soup time. Saves in the fridge for about a week if not canned.
Seven Flexible Chili Recipes
Chili is as much an art as a food. There are all kinds, from Betty Crocker to Buffalo Breath, and they range from something very Hormel-like, to soupy, to so thick a spoon stands up and bounces back when you hit it just like an inflatable Mr. Magoo (look it up, young blood, it was a thing).
The thing about chili is that YOU have to make up your OWN recipe. Oh, you may eventually try enough recipes to find one that is distinctly YOU, but it happens a whole lot faster if you are confident enough to just TRY to change a few things. So I'll give you some instruction in what to change for what kind of result.
- Some kinds of beans change the flavor, some kinds do not. And some people can TASTE that change, and some cannot!
Some beans just have a different texture, so they are noticeable. Different shapes may feel different in chili also. - All of the recipes below that have beans take 2 lbs of dry beans. If you need to use canned beans, then you can sub about 9-10 of beans instead. You need about a gallon of cooked beans, and each can has a little less than 1 pint. Same with your home canned beans, due to headspace and other issues, you'll have just less than a pint of beans per pint jar.
- Wheat can be subbed for beans, but it absorbs a LOT of flavor, and tastes different.
- Onions are important to the flavor of a good chili, they add a mellow sweetness and savoriness. For people who do not like onions, subbing in onion powder instead of chopped onion can help. For people who are really sensitive to onion, you can leave it out.
- Many people like a really garlicky chili. No reason not to bump it up if you like, but if you leave it out, you may or may not notice. Garlic flavor can get stronger during canning, also, so if you are going to can your chili, keep it mild.
- Chili powder is the essential flavor of chili. The thing that makes it chili. It isn't QUITE just chili peppers. Mostly. But not entirely.
This is a possible chili powder recipe - but don't blame me if you don't like it, I never tried it, I just went hunting to see if anyone gave a clue.
1⁄4 cup sweet paprika
1 teaspoon garlic powder
1 teaspoon cayenne pepper
1 tablespoon onion powder
1 teaspoon dried oregano
2 teaspoons ground cumin
citric acid is often added for a little tang
Now, one of the things about chili is that if you like really flavorful chili, make a mild chili powder, and put a LOT of chili powder in. Keep adding it until the flavor just sings! THEN add your heat - cayenne, chopped hot peppers, hotsauce, etc. Get that really zingy chiliness into it first, using only chili powder. That way you don't add a hot chili powder, and have all hot, no flavor. Flavor first, heat second. - You can put in any kind of peppers. I love sweet red or green peppers in chili, and have used orange or yellow. They do give different flavors. Hot peppers may have flavors in addition to hot, or they may just be HOT - you can also add hot sauce. Put in what you like, but be sure that you heat the chili and simmer for 10 minutes or so after each addition, because it takes time for the flavor to fully permeate the chili, and if you taste it too soon, you won't get the full impact of the heat that will come out within a few more minutes!
Red chili, and white chili kinda behave differently.
Red chili is thick because of the tomato base. White chili doesn't have that advantage, and there are three common ways to thicken it:
- With flour or masa flour, or other common thickeners, just like you thicken a stew.
- With cream cheese and sour cream.
- By just mashing some of the beans to let the beans thicken the chili.
We opted for method three, because it is the simplest, and requires the least specialized ingredients. But you can change that up any way you like.
White chili is less likely to be a heat challenge, more likely to be mild, but you can make it as hot as you like, just get the FLAVOR right, and then bump up the heat.
Black Bean Special
2 lbs dry black beans
5 qts water
3 lbs cooked ground beef
1 can diced tomato
1 can beef broth
1 large chopped onion
2 chopped sweet peppers
1-2 tbsp chili powder, maybe more
1 tsp garlic granules
1 tsp seasoning salt (I use Redmond Organic, and it is herby, so it really does make a difference)
1/4 tsp pepper
1/2 tsp curry powder
1/4 cup mango chutney (or other sweet chutney, apple butter, etc) (Shhhh... this is the secret ingredient!)
2 tbsp soy sauce
1 tbsp lime juice
1 stick real butter
salt to taste
Rinse and cook the beans until tender (if you don't know how to do this, you'll need to look it up). Drain the beans until there is just enough water to reach the top of them. Throw all the other ingredients in, and let simmer for at least half an hour, then start adjusting flavors. Remember to simmer after each adjustment, for 10 minutes or so, in order to really KNOW what the flavor did from the changes.
I make this in my instant pot. It's a 6 qt, so it barely holds all of this. I like my beans fairly tender, so I run it on a full bean cycle, throw everything else in, and run it again a second time.
This is a fairly simple chili recipe, but it is NOT terribly hot. It is more mellow than hot. My husband does not like hot spicy foods, so I just let him be with it. This also has a bit of a fruity side note, because of the chutney. It is just barely there, and not really obvious.
I serve this for dinner, and can the leftovers. That way I always have chili on hand for quick meals. It is just as good canned as it is right out of the pot.
Red Chili Con Carne
I've made chili for many years, and this is our family standard, from the days before I had so many digestive issues and found I could handle black beans better than pinto. Pintos are the standard for chili, but you can use Pink beans, small red beans, or combinations of beans. Kidney beans are a bit tough for me, for chili anyway. I like them in salad, but not in my chili!
This is a little hotter than the Black Bean Chili.
2 lbs dry pinto beans
5 qts water
3 lbs cooked ground beef
1 can diced tomato
1 can beef broth
1 large chopped onion
2 chopped sweet peppers
2-3 tbsp chili powder, maybe more
1/2 tsp cayenne
1 tsp garlic granules
1 tsp seasoning salt
1/4 tsp pepper
salt to taste
Rinse and cook the beans until tender (if you don't know how to do this, you'll need to look it up). Drain the beans until there is just enough water to reach the top of them. Throw all the other ingredients in, and let simmer for at least half an hour, then start adjusting flavors. Remember to simmer after each adjustment, for 10 minutes or so, in order to really KNOW what the flavor did from the changes.
You can make this in an instant pot, it will fit in a 6 qt pot, just barely. I like my beans fairly tender, so I run it on a full bean cycle, throw everything else in, and run it again a second time.
This is a fairly simple chili recipe, and it is very flexible. You can change it up all you want, with any customizations you need to suit your tastes.
Serve for dinner, or can it up. Or both. You can go ahead and can it even after it is cooked, and it doesn't lose much texture.
Red Chili No Beans
Oh, there is nothing better than a chili dog smothered in no-bean chili. I don't know what it is about the meat combo, but when I am craving real protein, it just hits the spot.
5 lbs cooked ground beef
1 can diced tomato
2 cans beef broth
2 large chopped onions
3 chopped sweet peppers
1-2 tbsp chili powder, maybe more
1/4 tsp cayenne
1 tsp garlic granules
1 tsp seasoning salt
1/4 tsp pepper
1 tablespoon soy sauce
salt to taste
Throw all the other ingredients into a pot, and let simmer for at least half an hour, then start adjusting flavors. Remember to simmer after each adjustment, for 10 minutes or so, in order to really KNOW what the flavor did from the changes.
You can do this in an instant pot, if you want to cheat, just cook the hamburger in a lump, and then break it up with a fork.
This is a fairly simple chili recipe, and it is very flexible. You can change it up all you want, with any customizations you need to suit your tastes.
Serve for dinner, or can it up. Or both. You can go ahead and can it even after it is cooked, and it doesn't lose much texture.
Red Chili Beans
Just the beans. You can bottle this up and can it for use in soups or as a chili-starter (so you can add different kinds of meat), or you can eat it as a veg chili.
2 lbs dry pinto beans
5 qts water
1 can diced tomato
1 can beef broth
1 shredded carrot (optional)
1 large chopped onion
2 chopped sweet peppers
1-2 tbsp chili powder, maybe more
1/4 tsp cayenne
1 tsp garlic granules
1 tsp seasoning salt
1/4 tsp pepper
1 tsp lime juice
salt to taste
Rinse and cook the beans until tender (if you don't know how to do this, you'll need to look it up). Drain the beans until there is just enough water to reach the top of them. Throw all the other ingredients in, and let simmer for at least half an hour, then start adjusting flavors. Remember to simmer after each adjustment, for 10 minutes or so, in order to really KNOW what the flavor did from the changes.
I make this in my instant pot. It's a 6 qt, so it barely holds all of this. I like my beans fairly tender, so I run it on a full bean cycle, throw everything else in, and run it again a second time.
This is a fairly simple chili recipe, and it is very flexible. You can change it up all you want, with any customizations you need to suit your tastes.
Serve for dinner, or can it up. Or both. You can go ahead and can it even after it is cooked, and it doesn't lose much texture.
White Chili Con Carne
This is as basic as it gets. You can add corn, or Monterey Jack cheese (or Pepper Jack) to it if you like, and top it with sour cream or other toppings to serve.
Remember, Great Northern and Navy beans DO taste different.
2 lbs dry White beans (Navy, Small White, Great Northern, Cannelini, or even Garbanzo)
5 qts Water
2 pints Broth (to match your meat)
3 lbs cubed and cooked Chicken, Turkey, or Pork
1 large onion
1 tsp garlic granules
1 stick butter
1 can green chiles (you may need to chop these, and you may want more)
1 tsp cumin
1/4 tsp cayenne (or more)
1/4 tsp pepper
1 tsp lime juice
Rinse and cook the beans until tender (if you don't know how to do this, you'll need to look it up). Drain the beans until there is just enough water to reach the top of them.
Throw all the other ingredients in, and let simmer for at least half an hour, then start adjusting flavors. Remember to simmer after each adjustment, for 10 minutes or so, in order to really KNOW what the flavor did from the changes.
Mash a little of the beans if you want it thickened, and stir well.
You can make this in an instant pot. A 6 qt will barely hold it all.
This is a fairly simple chili recipe, and it is very flexible. You can change it up all you want, with any customizations you need to suit your tastes.
Serve for dinner, or can it up. Or both. You can go ahead and can it even after it is cooked, and it doesn't lose much texture.
White Chili No Beans
No-bean white chili can be used as a topping over cornbread, rice, barley or other grains, or you can serve up White Chili Baked Potatoes, or White Chili Cheese Fries.
This is as basic as it gets. You can add corn, or Monterey Jack cheese (or Pepper Jack) to it if you like, and top it with sour cream or other toppings to serve.
2 pints Broth (to match your meat)
5 lbs cubed and cooked Chicken, Turkey, or Pork
2 large onions
1 tsp garlic granules
1 stick butter
1 can green chiles (you may need to chop these, and you may want more)
1 tsp cumin
1/4 tsp cayenne (or more)
1/4 tsp pepper
1 tsp lime juice
Rinse and cook the beans until tender (if you don't know how to do this, you'll need to look it up). Drain the beans until there is just enough water to reach the top of them.
Throw all the other ingredients in, and let simmer for at least half an hour, then start adjusting flavors. Remember to simmer after each adjustment, for 10 minutes or so, in order to really KNOW what the flavor did from the changes.
Thicken with 3-4 TBSP flour.
You can make this in an instant pot. A 6 qt will hold it all.
This is a fairly simple chili recipe, and it is very flexible. You can change it up all you want, with any customizations you need to suit your tastes.
Serve for dinner, or can it up. Or both. You can go ahead and can it even after it is cooked, and it doesn't lose much texture.
White Chili Beans
Sometimes you just need beans. Cook these up as a veg only meal, or can them for a meal starter so you can throw in whatever kind of meat you want.
This is as basic as it gets. You can add corn, or Monterey Jack cheese (or Pepper Jack) to it if you like, and top it with sour cream or other toppings to serve.
Remember, Great Northern and Navy beans DO taste different.
2 lbs dry White beans (Navy, Small White, Great Northern, Cannelini, or even Garbanzo)
5 qts Water
2 pints Broth
2large onions
1 tsp garlic granules
1 stick butter
1 can green chiles (you may need to chop these, and you may want more)
1 tsp cumin
1/4 tsp cayenne (or more)
1/4 tsp pepper
1 tsp lime juice
Rinse and cook the beans until tender (if you don't know how to do this, you'll need to look it up). Drain the beans until there is just enough water to reach the top of them.
Throw all the other ingredients in, and let simmer for at least half an hour, then start adjusting flavors. Remember to simmer after each adjustment, for 10 minutes or so, in order to really KNOW what the flavor did from the changes.
Mash a little of the beans if you want it thickened, and stir well.
You can make this in an instant pot. A 6 qt will hold it all.
This is a fairly simple chili recipe, and it is very flexible. You can change it up all you want, with any customizations you need to suit your tastes.
Serve for dinner, or can it up. Or both. You can go ahead and can it even after it is cooked, and it doesn't lose much texture.
Subcategories
Notice
The information on this site is presented for informational purposes only, and consists of the opinions and experiences of the site authors. It is not to be construed as medical advice or to be used to diagnose or treat any illness. Seek the assistance of a medical professional in implementing any nutritional changes with the goal of treating any medical condition. The historical and nutritional information presented here can be verified by a simple web search.
I do what I do because I understand the science behind it, and I've researched worldwide sources to verify the safety of my practices to my own satisfaction. Please do your own research, and proceed AT YOUR OWN RISK.

Real Food Recipes
- 67+ Fast Meals from Canned or Leftover Chili
- Admit It, You Eat Ramen Noodles!
- All The Tacos
- Awesome Swedish Meatballs (No Mushroom Soup)
- Bean and Bacon Soup (Similar to Campbell's)
- Butternut Squash and Bacon Soup
- Chocolate Marshmallow Fudge Sauce
- Clam Chowder And Seafood Bisque
- Easiest Chicken White Bean Chili Ever
- Easy German Potato Salad
- Family Pizza
- Incredible Tuna Salad
- Lasagna Madness
- Light Split Pea Soup
- Ma's Eggnog (Easy Probiotic Eggnog)
- Mango Chutney
- Muddy River Coleslaw
- Mushroom Steak Sauce
- Old Fashioned Applesauce and Apple Butter
- Old Fashioned Ham and Bean Soup
- Overripe Zucchini and Bacon Soup
- Peasy Leeky Soup
- Plaid Pajamas Hash
- Really Pork and Beans (Not Baked Beans)
- Red Bell Pepper Ketchup
- Refried Beans (for Canning)
- Salisbury Steak WITHOUT Mushroom Soup
- Scratch Soup Without A Recipe
- Scrumptious Maple Oatmeal Pancakes
- Seven Flexible Chili Recipes
- Seven Siblings Knockout Corn Chowder
- Sloppy Beyond Joe
- Southwest Bean Stew
- Tasty, Digestible, Aoudad (Canning and Preserving)
- The Scariest Ever Delicious Pickled Egg!
Related Sites
Interesting Sites